
ISO 1518 Scratch Test Method for Paints and varnishes — Determination of scratch resistance
When it comes to testing the durability of paint and varnish coatings, few methods are as widely recognized as the ISO 1518 Scratch Test. This standardized method allows manufacturers and quality control specialists to measure how well a coating resists mechanical damage under controlled conditions. The ISO 1518 test method determines the scratch resistance of single coatings or multi-coat systems of paint, varnish or related products by applying a defined load to a stylus that moves across the surface.

The test works by creating a controlled scratch on the coating’s surface, revealing valuable information about its performance in real-world applications. Whether you’re developing new coating formulations or evaluating existing products, understanding this test helps you make informed decisions about coating quality and durability.
Key Takeaways
- The ISO 1518 Scratch Resistance Test uses a stylus under constant load to evaluate coating durability under defined conditions.
- Test results help you compare different coating systems and determine if they meet specific performance requirements for various applications.
- Proper preparation of test panels and calibrated equipment are essential for obtaining accurate and reproducible results when conducting the test.
Scope of ISO 1518

The ISO 1518 standard specifically focuses on determining the scratch resistance of paints and varnishes under defined conditions. This test method applies to both single coating applications and multi-coat systems.
You can use this method to evaluate various coating materials including paints, varnishes, and related products. The test helps you assess how well these coatings withstand mechanical damage from scratching.
The standard is divided into two parts. ISO 1518-1 covers the constant load method, while ISO 1518-2 addresses the variable load approach. Both provide standardized procedures for consistent testing.
When you conduct this test, you’ll be able to determine the minimum load at which visible damage occurs to the coating surface. This information is valuable for comparing different coating formulations and their durability.
The scope does not extend to other forms of mechanical resistance such as impact or abrasion testing. It is specifically designed for scratch resistance evaluation only.
This test method is applicable to laboratory samples as well as coated manufactured products. You can perform these tests on flat surfaces prepared according to the standard’s specifications.
Principles of the Scratch Test Method


The ISO 1518 scratch test evaluates a coating’s ability to resist mechanical damage by applying controlled pressure with a stylus. This method helps determine critical failure points of paint and varnish coatings.
Scratch Test Equipment
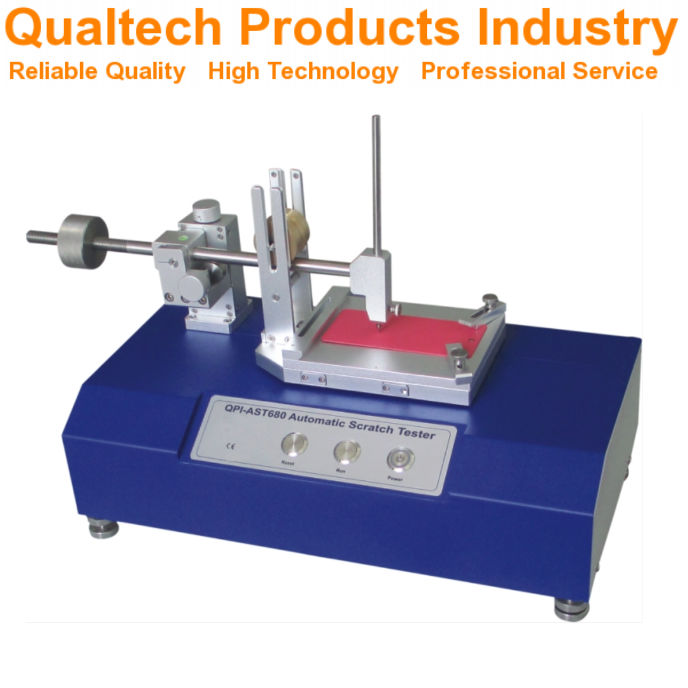
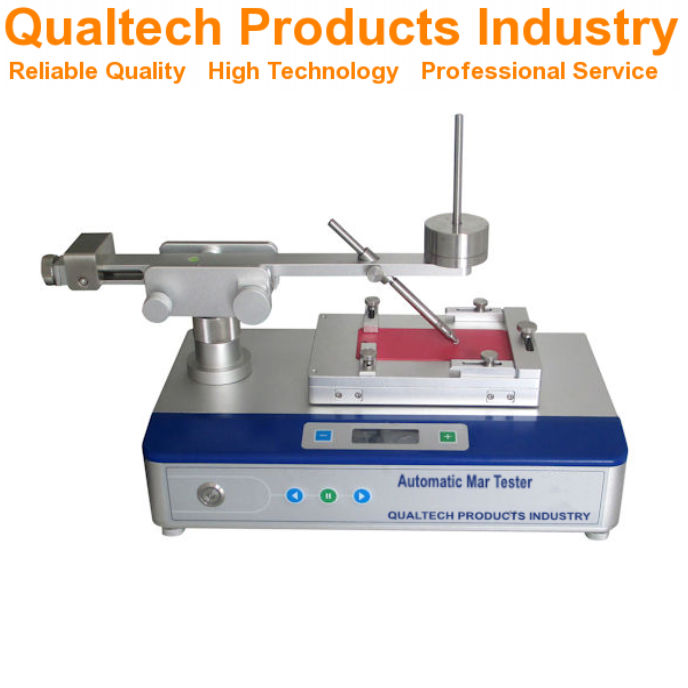
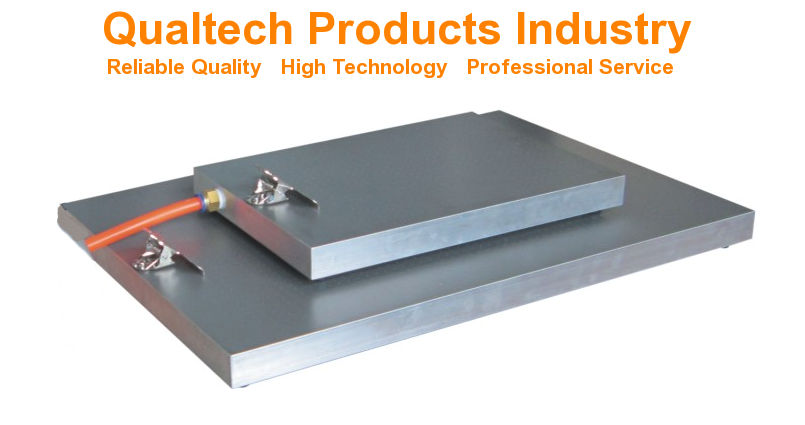
The test requires a scratch tester apparatus that consists of a hemispherical-tipped stylus and a loading mechanism. According to ISO 1518-1, the stylus is typically made of hardened steel with a tip radius of 0.5 mm. The apparatus must be capable of moving the stylus across the coating at a constant speed.
The loading mechanism applies a defined, stable force perpendicular to the coating surface. You’ll need a device to measure this force accurately, usually in newtons.
The equipment should also include a means to secure the test panel firmly to prevent movement during testing. Some advanced models include optical systems to observe and record the scratch formation in real-time.
Test Parameters Setup
Before conducting the test, you must properly configure several key parameters. The applied load is critical and can be adjusted incrementally to determine the threshold at which coating failure occurs.
The test speed must be kept constant, typically between 30 mm/s to 40 mm/s. This ensures consistent results across different test sessions.
Temperature and humidity conditions should be standardized, usually at 23°C ± 2°C and 50% ± 5% relative humidity unless otherwise specified.
Your test panels must be prepared according to specific requirements with uniform coating thickness. The surface should be clean and free of contaminants.
Rest time between coating application and testing is also important, typically minimum 7 days for air-drying paints or as specified in the product data sheet.
Preparation of Test Panels


Proper test panel preparation is crucial for accurate ISO 1518 scratch resistance testing. You must select panels that match your real-world application requirements.
For standard testing, use flat metal panels made of steel, aluminum, or tin plate. These panels should be clean and free from any defects that might affect test results.
Before coating application, you must clean the panels thoroughly to remove grease, dust, and other contaminants. Wipe the surface with a suitable solvent like acetone or isopropyl alcohol, then allow it to dry completely.
Apply the coating (paint or varnish) to the test panel according to the manufacturer’s instructions. This includes following recommended application methods, thickness, and drying conditions.
Important panel specifications:
- Size: Typically 150 mm × 100 mm
- Thickness: Minimum 0.8 mm for metal panels
- Flatness: Panels must be flat without warping
The coating should be applied evenly across the entire panel. You may need to measure the dry film thickness to ensure uniformity using a suitable measurement device.
Allow the coated panels to dry and cure completely according to the test method specifications. This typically includes:
- Drying at room temperature (23 ± 2)°C
- Relative humidity (50 ± 5)%
- Minimum curing time of 7 days (unless otherwise specified)
Before testing, condition the panels at the standard testing temperature and humidity for at least 16 hours.
Performing the Scratch Test

The scratch test requires careful execution to obtain reliable results. Proper technique and control of variables ensure consistent measurements of coating resistance to mechanical damage.
Applying the Scratch
To perform the scratch test according to ISO 1518, you must first secure your test panel firmly on a stable surface. The stylus tip should be positioned at one end of the intended scratch path.
Apply the predetermined constant load to the stylus. For the constant loading method described in ISO 1518-1, you need to select the appropriate weight based on coating type and expected performance.
Move the stylus across the coating at a steady speed of 30-40 mm/s. Maintain consistent pressure and angle throughout the test. The scratch should be approximately 10 cm long.
After completing the scratch, examine the resulting mark under good lighting conditions. Look for coating penetration down to the substrate, which indicates failure at that load level.
Control of Test Variables
Temperature and humidity significantly affect test results. You should conduct tests at 23 ± 2°C and 50 ± 5% relative humidity unless otherwise specified for specific coating types.
Das test apparatus must be calibrated regularly to ensure accurate loading. Check the stylus tip condition before each test session—damaged or worn tips can invalidate results.
Substrate preparation and coating application must be standardized. Record film thickness at multiple points across the test panel.
Key variables to control:
- Speed of stylus movement
- Applied load precision (±0.1N)
- Stylus tip geometry (1 mm hemispherical)
- Panel temperature
- Coating age (fully cured)
Evaluation of Scratch Resistance


After conducting the ISO 1518 scratch test, proper evaluation of the results is crucial for determining coating performance. The assessment involves both qualitative visual inspection and quantitative measurement techniques.
Visual Inspection Criteria
The visual inspection of scratch resistance follows specific criteria outlined in the ISO 1518 standard. You should examine the tested surface under good lighting conditions, preferably using a light source at 45° to the surface.
Look for the following key indicators:
- First visible scratch mark: The lowest load at which a continuous scratch becomes visible
- Penetration to substrate: The load at which the coating is penetrated to reveal the substrate
- Coating deformation: Any signs of cracking, flaking, or delamination
You must record the results in newtons (N) to the nearest 0.1 N. For multi-coat systems, note which layer has been exposed by the scratch.
Take photographs of the scratch patterns for documentation purposes if required by testing protocols.
Measurement of Scratch Width
The scratch width measurement provides quantitative data for comparing different coating formulations. You can measure scratch width using:
- Optical microscope: With calibrated reticle or digital measuring capability
- Profilometer: For precise depth and width measurements
- Image analysis software: For automated measurement of scratch dimensions
Record measurements at several points along the scratch length, typically at 5 mm intervals. The standard testing procedure requires a minimum of five measurements to calculate an average width.
Express results in micrometers (μm) with appropriate precision. Higher quality coatings typically show narrower scratch widths at equivalent loads. Plot the scratch width against applied load to create a performance curve for comparative analysis.
Reporting Test Results

Accurate documentation of scratch resistance testing results is essential for quality control and product development. Proper reporting allows for meaningful comparisons between different coating formulations and helps determine if products meet required specifications.
Data Representation
When reporting ISO 1518 scratch test results, you should include both numerical and visual documentation. Record the critical load at which coating failure occurs in Newtons (N) for constant load tests according to ISO 1518-1. For variable load tests, document the minimum load that causes coating penetration.
Include photographs of the scratch patterns when possible. These provide visual evidence of the failure mode and help with future reference.
Create a standardized table format that includes:
- Sample identification
- Test date
- Applied load(s)
- Number of test repeats
- Mean critical load value
- Standard deviation
Each test report should clearly indicate which part of ISO 1518 was used (Part 1 or Part 2) as the test methodologies differ significantly.
Interpretation Guidelines
You should establish clear pass/fail criteria before conducting tests. Define the minimum acceptable scratch resistance value based on product specifications or industry standards.
When interpreting results, consider the following factors:
- Failure mode: Distinguish between complete penetration to substrate versus surface deformation
- Pattern consistency: Evaluate if failures occur uniformly or at random points
- Comparative analysis: Compare results against reference materials or previous batches
Note that higher critical load values indicate better scratch resistance. However, interpret results in context of the coating’s intended application environment.
Be careful not to overinterpret minor variations between samples. Statistical significance should be established before concluding meaningful differences exist. Consider environmental factors like temperature and humidity which may influence test outcomes.
Quality Control and Reproducibility

Ensuring reliable test results with the ISO 1518 scratch test requires strict quality control measures. This qualification is essential for industries where coating durability directly impacts product performance.
To maintain reproducibility, you must regularly calibrate your testing equipment. The scratching tool, particularly the hemispherically tipped needle mentioned in ISO 1518, requires inspection for wear or damage before each test session.
Environmental conditions play a crucial role in test consistency. You should conduct tests at standard temperature (23 ± 2°C) and relative humidity (50 ± 5%) unless otherwise specified.
Key Quality Control Factors:
- Equipment calibration
- Needle condition verification
- Consistent sample preparation
- Standardized environmental conditions
- Trained operators
Sample preparation techniques must follow the guidelines outlined in ISO 1518-1:2019. This includes proper curing time and uniform application thickness.
Test operators should receive thorough training on both equipment operation and result interpretation. Your interpretation criteria must be consistent across all testing personnel.
For multi-lab testing scenarios, round-robin testing helps verify consistency. You should establish acceptable variance ranges for your specific testing application.
Documentation is essential for quality assurance. Your records should include all test parameters, environmental conditions, and detailed observations of coating behavior during testing.
Maintenance and Calibration of Equipment

Proper maintenance and regular calibration of scratch test equipment ensure accurate and repeatable results when testing paint and varnish surfaces according to ISO 1518 standards. These practices are essential for maintaining the integrity of test data over time.
Routine Maintenance
Clean the scratch tool tip after each test to prevent cross-contamination between samples. Inspect the hemispherical tip regularly under magnification for signs of wear, deformation, or damage that could affect test results.
Replace the needle tip when any flattening or irregularities are observed, as this will compromise the validity of your scratch resistance measurements. Most manufacturers recommend tip replacement after approximately 100 tests.
Store the scratch tester in a dust-free environment and cover when not in use. Regularly check moving parts and loading mechanisms for smooth operation, applying appropriate lubricant as specified by the equipment manufacturer.
Wipe down guide rails and load-bearing surfaces monthly with a lint-free cloth. Examine the base plate for flatness and clean test surfaces thoroughly before mounting specimens to ensure proper contact.
Calibration Procedures
Calibrate your scratch tester at least every six months or after 500 tests, whichever comes first. Use certified reference materials with known scratch resistance values to verify equipment performance.
The load application system must be calibrated using certified weights traceable to national standards. Check that the applied force matches the displayed or set values within ±2% across the full range of test loads.
Calibration Check Points:
- Zero point verification
- Linear response across load range
- Speed control accuracy (5 mm/s ±0.5 mm/s)
- Horizontal movement stability
Maintain a calibration log documenting dates, procedures, results, and any adjustments made. When calibrating the scratch tip geometry, use a calibrated microscope to verify the 1 mm diameter hemispherical shape as specified in ISO 1518-1.
Record ambient conditions during calibration, as temperature and humidity can influence test performance. If your equipment fails calibration checks, contact the manufacturer for service before conducting further tests.
Safety Considerations

When performing the ISO 1518 scratch test for paints and varnishes, you should always prioritize safety. The test involves sharp instruments that could cause injury if mishandled.
Always wear appropriate personal protective equipment (PPE) during testing. This includes safety glasses to protect your eyes and gloves to protect your hands from sharp tools and chemicals.
The test may involve working with paints and varnishes that contain volatile organic compounds (VOCs). Ensure your testing area is well-ventilated to prevent inhalation of potentially harmful fumes.
Keep your workspace clean and organized. This reduces the risk of accidents and ensures accurate test results. Store all testing equipment properly when not in use.
Essential Safety Equipment:
- Safety glasses
- Protective gloves
- Lab coat
- Proper ventilation system
Be aware of the physical hazards associated with the testing apparatus. The scratch testing needles have sharp tips that can cause puncture wounds if mishandled.
When disposing of test samples and materials, follow local regulations for chemical waste disposal. Some coating materials may be classified as hazardous waste.
If you’re operating automated scratch testing equipment, ensure you’re familiar with the manufacturer’s safety instructions before use. Never bypass safety features on testing equipment.
Document any safety incidents during testing and review procedures regularly to prevent future occurrences. Your safety should always be the primary concern when conducting any laboratory testing.
Frequently Asked Questions

The ISO 1518 scratch test method includes specific parameters for measuring coating durability and resistance to mechanical damage. These common questions address testing equipment, applicable coatings, and result interpretation.
What types of coatings can be evaluated using the ISO 1518 scratch test method?
The ISO 1518 scratch test method can evaluate a wide range of coating materials. This includes single coatings or multi-coat systems of paint, varnish or related products.
You can test both decorative and protective coatings on various substrates. The method works well for automotive finishes, industrial coatings, and architectural paints.
What apparatus is required to conduct the scratch resistance test as per ISO 1518 standards?
The primary instrument needed is a scratch tester with a hemispherically tipped needle. This device must allow controlled application of force during the scratching process.
You’ll also need proper sample preparation tools and a means to measure the applied load. Some versions require a constant-load apparatus while others use a progressively increasing load mechanism.
How does the ISO 1518 method measure the scratch resistance of paints and varnishes?
The ISO 1518 method measures scratch resistance by drawing a hemispherically tipped needle across a coated surface under defined conditions. The test evaluates how well the coating withstands this mechanical stress.
You can observe at what load the coating begins to show damage. The higher the load required to produce visible damage, the better the scratch resistance of the coating.
What are the differences between ISO 1518-1 and ISO 1518-2 standards regarding scratch resistance testing?
ISO 1518-1 uses a constant load method where a specific weight is applied throughout the test. This provides a straightforward pass/fail assessment at predetermined loads.
ISO 1518-2 employs a variable load technique where force increases progressively during the test. This allows you to determine the exact load at which coating failure occurs.
How are scratch resistance test results interpreted under ISO 1518 guidelines?
Results interpretation depends on whether you’re using the constant load (ISO 1518-1) or variable load (ISO 1518-2) method. For constant load tests, you report whether the coating showed damage at each tested load.
For variable load tests, you record the minimum load that caused coating penetration. Higher numerical values indicate better scratch resistance properties.
Can ISO 1518 scratch test method be applied to both water-based and solvent-based coatings?
Yes, the ISO 1518 scratch test method works equally well for water-based and solvent-based coating systems. The test evaluates physical resistance properties regardless of the coating chemistry.
You can compare different coating technologies using this standardized approach. This makes it valuable for product development and quality control across various coating formulations.
- Published in Science & Research
ASTM D823 Standardverfahren zur Herstellung von Filmen gleichmäßiger Dicke von Farbbeschichtungen und verwandten Produkten auf Testplatten
Getting the right thickness when applying paint and coatings is crucial for proper testing and quality control. ASTM D823-18 provides five standardized practices for creating uniform paint films on test panels, helping you achieve consistent and reliable results in your coating applications.


This standard, first established in 1945 and updated in 2022, falls under the oversight of the ASTM Committee D01 on Paint and Related Coatings. It gives you specific methods to prepare test panels that meet industry requirements for thickness uniformity.
You’ll find detailed guidelines for applying coatings to test panels, which is essential for accurate performance testing and quality assessment of paints and similar products. These practices ensure your test results are reliable and comparable across different testing scenarios.
Key Takeaways
- The standard outlines five distinct methods for applying uniform paint films to test panels
- Your test results become more reliable when following these standardized application practices
- Paint thickness uniformity directly affects the accuracy of performance testing and quality control
Scope of ASTM D823-18


ASTM D823-18 provides standard practices for creating uniform paint and coating films on test panels. These practices help you achieve consistent results when testing paint properties.
The standard covers three main methods for applying coatings:
- Method A: Hand-operated film applicators
- Method B: Mechanical film applicators
- Method C: Spray application equipment
You can use these practices to prepare test panels for evaluating paint quality, durability, and appearance. The methods work with paints, varnishes, lacquers, and related coating materials.
The standard falls under ASTM Committee D01 on Paint and Related Coatings, Materials, and Applications. Subcommittee D01.23 on Physical Properties of Applied Paint Films manages these practices.
These practices help you create test specimens with uniform thickness. This uniformity is essential for accurate testing of coating performance and characteristics.
Referenced Documents


ASTM D823-18 lists several key standards and test methods that support proper film thickness measurement and panel preparation for paint and coating testing.
Standards Referenced
Das test method for measuring dry film thickness references ASTM D1005, which uses micrometers for organic coatings.
You’ll need to follow ASTM D609 when preparing cold-rolled steel panels for testing paints, varnishes, and conversion coatings.
For wet film thickness measurements, use ASTM D1212 test methods specifically designed for organic coatings.
These standards work together to ensure consistent and accurate testing procedures. You must follow each referenced standard’s specific requirements to maintain proper testing conditions and get reliable results.
Bold text indicates critical standards:
- ASTM D609 – Steel panel preparation
- ASTM D1005 – Dry film measurement
- ASTM D1212 – Wet film measurement
Terminology


Key terms in ASTM D823 help paint manufacturers and technicians create uniform test films using standardized application methods and measurements.
Definitions of Terms Specific to This Standard
Paint film application techniques include drawdown, where you pull paint across a surface with a blade or bar to create an even coating thickness.
Film thickness refers to the measured depth of the dried coating on your test panel. You must maintain consistent thickness across the entire panel surface.
EIN test panel is your prepared substrate material, like metal or plastic, that you’ll apply the coating to for evaluation.
Uniform film means the coating has even distribution and consistent thickness, without areas that are thicker or thinner than specified. You need this uniformity to get accurate test results.
Automated spray application uses machine-controlled spray equipment to apply coatings with precise, repeatable settings for pressure, distance, and speed.
Significance and Use


ASTM D823 practices are essential when working with coatings meant for spray applications in factories or field settings. These methods help you achieve consistent results whether you’re coating objects indoors or outdoors.
The practices are particularly important when you need to evaluate metallic coatings for their appearance qualities. This includes testing properties like gloss and color consistency across surfaces.
When you apply coatings using these test methods, you may notice a slight orange-peel texture or spray wave pattern. This is normal and matches what you’d typically see in real-world applications.
These standardized application methods ensure your test results are reliable and repeatable. You can use them to compare different coating products or evaluate coating performance under various conditions.
Das five distinct practices give you flexibility in choosing the most appropriate method for your specific coating type and testing needs. Each practice helps you create uniform film thickness, which is crucial for accurate testing and evaluation.
Apparatus


Proper equipment and tools are essential for producing uniform paint films and coatings on test panels. The specific requirements for panels, application tools, and testing equipment ensure consistent and reliable results.
Test Panel Specifications
Test panels must be flat, rigid, and clean to achieve uniform coating thickness. You should use panels made from steel, aluminum, glass, or other ASTM-approved materials.
The panels need precise dimensions with squared edges and no surface defects. Standard panel sizes range from 3×6 inches to 6×12 inches, depending on your testing requirements.
Surface preparation is critical. Clean panels thoroughly with solvents to remove oils, dust, and contaminants before coating application.
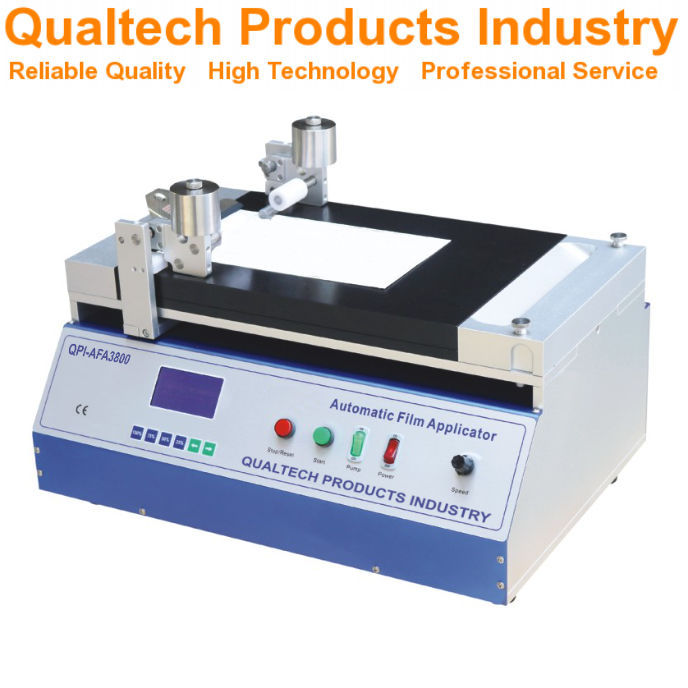
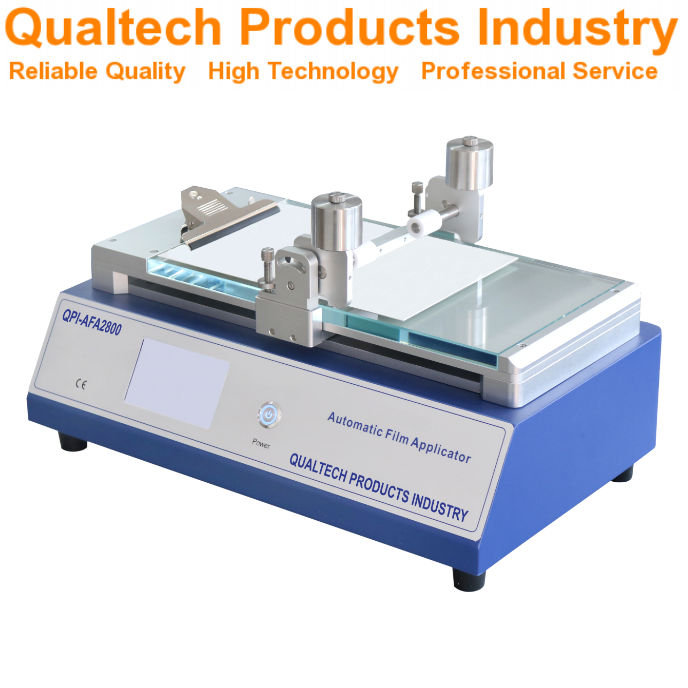
Film Application Tools
Five main application methods are used for creating uniform films:
- Automated spray machines
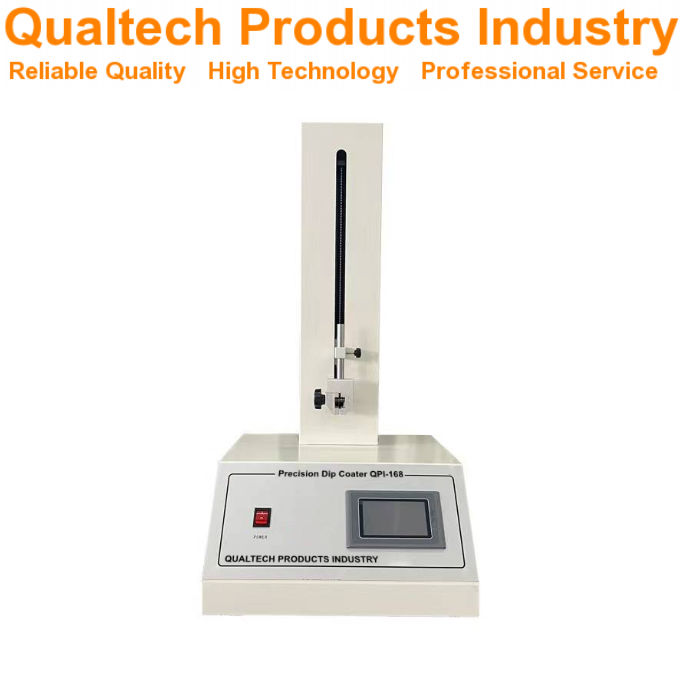
- Motor-driven dip coaters
- Motor-driven blade applicators
- Hand-held spray guns
- Manual blade applicators
Each tool must be properly maintained and calibrated before use. Automated equipment provides better consistency than manual methods.
Keep spray nozzles clean and adjusted to the correct settings. Replace worn blades and applicators regularly.
Conditioning and Testing Equipment
Your testing area needs controlled temperature and humidity conditions. Use calibrated thermometers and hygrometers to monitor the environment.
Standard conditions require:
- Temperature: 23 ± 2°C
- Relative Humidity: 50 ± 5%
Film thickness gauges and measuring devices must be properly calibrated. Store panels horizontally in dust-free conditions while films cure.
Use appropriate drying racks that don’t disturb the wet film. Monitor cure times according to coating specifications.
Test Specimens


Proper test panel preparation and film application methods are essential for achieving accurate coating evaluation results. These practices help ensure consistent, reliable testing of paints and coatings.
Preparation of Test Panels
Test panels must be clean and free from contaminants before coating application. Select panels made from metal, glass, plastic, or wood based on your testing requirements.
Clean panels thoroughly with solvents appropriate for the substrate material. For metal panels, use mineral spirits or acetone to remove oils and residues.
Sand the surface if needed to achieve proper roughness and adhesion characteristics. Wipe panels with lint-free cloths to remove dust.
Panel preparation guidelines specify maintaining consistent temperature and humidity during preparation, typically 23°C ± 2°C and 50% ± 5% relative humidity.
Filmanwendung
Five standardized practices exist for applying uniform coating films: automated spray machine, motor-driven dip coater, motor-driven blade, hand-held spray gun, and drawdown techniques.
Choose your application method based on the coating type and required film thickness. Automated methods provide better repeatability than manual techniques.
Maintain proper application conditions:
- Temperature: 23°C ± 2°C
- Relative humidity: 50% ± 5%
- Air flow: Minimal draft
- Surface position: Horizontal or vertical as specified
Allow films to cure under controlled conditions. Record application method, conditions, and cure time for each specimen.
Procedure


The paint application process requires careful control of conditions and techniques to achieve high-quality test results. Following standardized methods ensures consistent film thickness and proper coating performance.
Environmental Conditions
You must maintain specific temperature and humidity levels in your testing area. Keep the room temperature between 23°C ± 2°C (73.4°F ± 3.6°F).
The relative humidity should stay between 50% ± 5%. Check these conditions at least 24 hours before starting the application process.
Record environmental readings at the start and end of each coating session. This helps track any variations that might affect film formation.
Coating Uniformity
Apply the coating using automated spray equipment for the most consistent results. Set the spray gun mount to move at a steady speed across the test panel.
Maintain a constant distance between the spray nozzle and test panel surface. The typical range is 6-8 inches.
Check the coating thickness while it’s wet using a wet film thickness gauge. Make several measurements across the panel surface.
Look for any signs of:
- Orange peel texture
- Runs or sags
- Uneven coverage
- Edge buildup
Drying and Curing
Position coated panels horizontally during initial drying. This prevents runs and ensures even film formation.
Keep panels away from direct airflow or heat sources during the first stages of drying.
Follow the manufacturer’s recommended cure times and temperatures. Most coatings need:
- 24-48 hours at room temperature
- OR 30-60 minutes at elevated temperatures (specified by coating type)
Test the hardness and adhesion only after full cure. Early testing can damage the coating film.
Report

Proper reporting of test results from paint film thickness measurements ensures data accuracy and repeatability across different testing environments.
General Reporting Requirements
You must document all test conditions and methods used during the film thickness measurement process. Record the ambient temperature and relative humidity of the testing environment.
List all equipment used, including calibration dates and equipment identification numbers. Document any deviations from standard testing procedures.
Note the specific type and batch number of paint or coating tested. Include details about the test panel material, surface preparation methods, and application techniques used.
Test Results
Record film thickness measurements in micrometers or mils, taking multiple readings at specified points across the test panel surface. Include both individual measurements and calculated average values.
Note any defects, irregularities, or non-uniform areas observed in the coating film. Document visual observations of film quality, including surface texture and appearance.
Provide statistical analysis of measurement data when required, including standard deviation and variance. Include photographs or diagrams of measurement locations on test panels when needed for clarity.
Precision and Bias

ASTM D823-18 does not include specific precision and bias data for the described practices. This is because the method focuses on preparation techniques rather than measurement results.
The precision of your film thickness will depend heavily on your equipment calibration and skill level. You need to maintain proper calibration of all measuring devices and applicators.
Regular verification of your test panels and application methods helps ensure consistent results. You should check your procedures against the ASTM D823 standard practices to maintain quality.
Common factors affecting precision include:
- Environmental conditions
- Application technique
- Equipment maintenance
- Panel preparation quality
- Film applicator condition
Your coating thickness measurements must be made according to appropriate ASTM standards for the specific type of coating being tested. This ensures your results can be compared with other labs following the same procedures.
When you report results, note any deviations from standard practices that might affect the uniformity of the film thickness. Keep detailed records of application conditions and methods.
Keywords

Paint films, coatings, test panels, film thickness, application methods, paint thickness testing, film uniformity.
ASTM D823-18 falls under the scope of ASTM Committee D01 on Paint and Related Coatings, Materials, and Applications.
The specific subcommittee responsible for this standard is D01.23 which focuses on Physical Properties of Applied Paint Films.
These standard practices were first established in 1945 and the current version was approved in 2022.
Key terms you’ll encounter in this standard include:
- Film application
- Coating thickness
- Test panel preparation
- Uniform film production
- Paint application methods
- Quality control testing
- Surface preparation
Frequently Asked Questions

The ASTM D823-18 standard covers specific practices for creating uniform paint and coating films on test panels through multiple application methods. These practices address equipment requirements, process variables, safety protocols, and quality control measures.
What is the scope of ASTM D823-18 and what does it cover regarding film application?
Five distinct practices make up ASTM D823-18, each focused on producing uniform coating thickness on test panels. These practices include automated spray application, motor-driven dip coating, and other specialized methods.
The standard applies to paints, varnishes, and related coating materials used in testing and quality control applications.
Can you explain the methodologies outlined in ASTM D823-18 for achieving uniform thickness?
The standard specifies automated spray machines as one primary method for achieving consistent film thickness.
You must maintain precise control over application speed, distance, and material flow rate during the coating process.
Dip coating requires controlled immersion and withdrawal rates to ensure even coverage.
How does ASTM D823-18 differ from ASTM D3258 in terms of film application?
ASTM D823-18 focuses specifically on creating uniform thickness films for testing purposes. It emphasizes automated and mechanical application methods.
D3258 deals more broadly with paint film evaluation and includes different testing parameters.
What are the equipment requirements specified in ASTM D823-18 for preparing test panels?
You need calibrated automated spray equipment or dip coating machinery that can maintain consistent speeds and distances.
The test panels must meet specific cleanliness and surface preparation standards.
Your equipment must be able to control application parameters like pressure and flow rate precisely.
What variables should be controlled during the application process as per ASTM D823-18?
Temperature and humidity in your testing area need strict monitoring and control.
Material viscosity and application speed require consistent measurement and adjustment.
Distance between spray equipment and test panels must remain uniform throughout the process.
What are the safety considerations to keep in mind when following ASTM D823-18 practices?
You must use proper ventilation when working with paint and coating materials.
Personal protective equipment including respiratory protection, gloves, and eye protection is essential.
Keep all equipment properly grounded to prevent static electricity buildup.
- Published in Science & Research